July 27, 2013

Dyeing Wool With Motherwort

Motherwort (Leonurus cardiaca) is considered by some to be a weed. It grows into a large plant that looks like nettles, except it has purple flowers along the stems.  The plant grows from one and a half to four feet tall. It has single square stems coming from the bottom with no branching. I have been curious about this plant for some time but have not been able to find any information on using it to dye wool. We have some on our property so I thought that I would give it a try.

I cut one whole plant down. I cut it into small pieces and boiled it for several hours. I let it steep over night. I wanted to see what different assists would do to the color so I collected several samples if the dye while it was cooking. I added different things to each sample. Some of the things I tried adding were citric acid, vinegar, baking soda, and washing soda. None of these had any visible effect on the color.  I am curious about copper, but don't have any on hand so that will be for next time.

It is said that greens are surprisingly some of the hardest colors to get with natural dye. I have seen a beautiful green wool obtained from Mullein with a copper mordant. I have been looking for some of that, I know it grows around here. I then have to wait until my copper mordant (copper wire in vinegar and water) is ready to use.


The yarn in this picture was a yellow obtained from Leafy Spurge. As you can see in the roving, the color from the Motherwort does not have green in it anymore.

Meanwhile, I am busy spinning up all the wool I have dyed from local plants. I do a spinning demonstration each year at the Rosholt Area Threshing Bee. It is the third weekend in August. It is a lot of fun for the whole family. I want to have some of the yarns I have dyed with the weeds the farmers are fighting in their fields. More information on the Threshing Bee is available at the RATA website Rosholt Threshing Bee


Rosholt Threshing Bee

July 24, 2013

Red Cabbage Revisited


I decided that I was unhappy with my first attempt at dyeing wool with red cabbage (see 6/22/13). I have seen so many examples where people have gotten much stronger colors than I did. I decided to try the whole thing over still using alum and cream of tarter as a mordant. I prepared the dye bath the same as before, only this time I mordanted the yarn, not the pot. I was hoping this would result in stronger colors in the yarn. I have read that you can mordant the pot if you are only going to use one mordant. Later, I read in another article that not all the mordant bonds with the fiber that way and that some may stay in the pot. Any comments either way on this would be appreciated.

I dyed one 100g skein of a yarn I had spun using 25% silk and 75% wool. I also dyed 100g of hand spun wool. I used the low heat method to mordant both skeins since I had silk in one. Over heating silk can cause it to lose its luster. With this method, I added the mordant to the water and brought it to a boil, making sure the mordant was completely dissolved. I then turned the heat off, let the pot stand for a couple minutes and then added the yarn. I let these stand over night and rinsed them both well in the morning.

The first pot I ran was the green. I used the yarn with the silk in it for this. I figured I could simmer the second batch for the red if I needed to. I used the low heat method to dye the yarn. Again, I brought the dye pot to a boil and then let it stand for a few minutes. I also added a half tablespoon of baking soda. This turned the pot to green. I added the yarn and took the pot off the stove. I let it steep until it was completely cooled. I m very happy with the results I got!


After removing the yarn from the dye bath I washed it in Eucalan and let it dry. Then I got the pot ready for the second run, the red run. I heated the dye bath back up to simmer. This time I added citric acid to the pot until I got a nice shade of red. There was a lavender in there during the shift, but I couldn't keep it. (next time...).

I simmered this pot for about and hour, then removed the yarn, washed it and let it dry as well.
I a much happier with these results. I am glad I kept at it.


July 23, 2013

Dyeing with Onion Skins

I have heard it said that if you dye with onion skins you will never throw them away again! I think this may be true. There is such a variety of colors you can obtain with onion skins. I would like to try a lot of different things, different mordants, different modifiers, combinations of colors and all sorts of different things. I made a dye bath yesterday using 120g of dried onion skins. I boiled them for over an hour and let the steep until cool.

I had mordanted a pound of my wool roving and a skein of super wash bare yarn. I used 8% alum and 4% cream of tarter. I simmered this for an hour and then let it stand over night. I rinsed them all before dyeing them.

I dyed the yarn first. I simmered the yarn in the pot for an hour and then let it steep until it was cool. The result was a yarn I keep calling carrot instead of onion skin! It is a beautiful color in pot and after it was rinsed!

There seemed to be still a lot of color in the pot. I decided to run some more batches using some of the roving. I got four batches (one pound) of wool dyed with that one pot. The picture below shows all four batches in succession, left to right.


I was surprised by the result. Instead of just getting lighter and lighter, the amount of orange varied with each batch as well. The third batch seemed to have more orange than either the second or fourth!

That is all the dyeing with onion skins I got done today. I did do a second boil of the onion skins and will be curious to see the results from that compared to these.

I also followed a recipes I found for making an iron and a copper mordant. The iron is made with a ratio of 2:1 clear vinegar to water with some old iron nails steeping in it. The copper mordant is a 1:1 ratio of of clear vinegar with some copper wire steeping in it. They both have to steep for several days to weeks before they will be ready to use. That will allow even more colors from the same onion skins!


July 22, 2013

A Day of Dyeing

Well after all the prep work Saturday, Sunday was dyeing day.  I had a pound of roving and 320 yards of home spun yarn to play with. My friend, Susie, got here at about 11:00 in the morning. She brought two bags of onion skins which I immediately put in a pot of water and started to boil.

(L to R: Box Elder bark, onion skins, Sow Thistle with some additions-see below, grey wool dyed with Quebracho Red).


Susie is making paper these days so I have been saving the plant material and spent dye baths for her. I dry the vegetable matter on screens and then if it something she thinks is interesting she uses it in her paper.  I had dried the Box Elder bark for Susie, but she said she couldn't use it. After boiling the Sow Thistle, we dried that and it will become part of her paper. I did a second boil on the onion skins and those will be dried for paper as well. I also have boiled red cabbage for her.


We removed the yarn from the Box Elder dye pot where it had been steeping over night.  No more color appeared to develop by letting it stand. The result is a very nice beige color. It was a lot of work for the color, so even though I like it, I probably won't do it again.  Besides, the smell was really awful!

We looked at the jar of sow thistle petals (see 7/20/13). We decided to try to get a bit more color be heating them. I simmered them in a pot for a while and the strained and cooled the liquid. I added the wool and heated it. It looked a lot like the leafy spurge wool, so I added some Cream of Tartar. The pot quickly lost much of its color! I don't understand why that would happen. Any ideas would be appreciated!

I decided that since I had other pots going, I would just play around. I added a cup of Quebracho Red dye bath and a cup of the onion skin dye bath. I let that simmer for a while longer and then cooled the pot. One thing I have learned from the dyeing I have done this summer is that unless you are attempting to get a specific color, you can't make a mistake! I have thought on occasion that I have done something to 'ruin the pot' but so far, I have not come up with a color using natural dye stuff that I don't like!

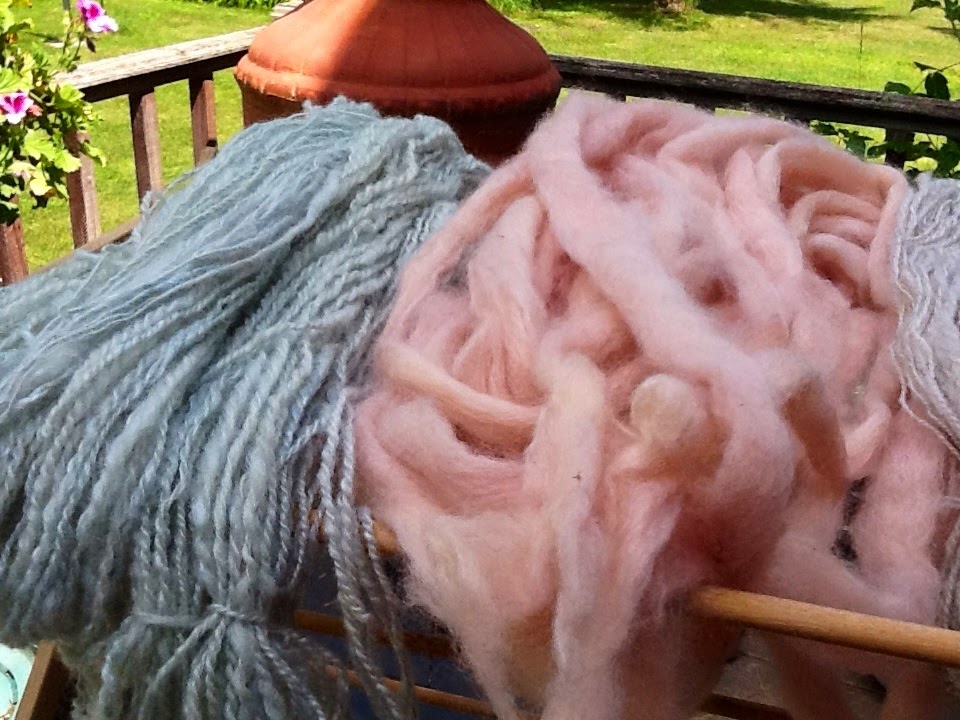
This is the yarn ready to spin. It turned into a lovely apricot color!


The last experiment for the day was to try dyeing some of my naturally grey wool. I have a fleece that is a beautiful silvery grey. I wanted to use something with a fairly strong color. I still have the dye bath from the first run of Quebracho Red. I decided to try that. At first I was disappointed with the results. It just looked as though it had darkened the yarn. After the yarn was completely dry, I realized that there is some of the salmon color of the Quebracho. It may be hard to see in the photo.

The wool on either side is the wool that was dyed. The wool in the middle is the natural color greywool. It turned out prettier than what it looks in the picture.


July 20, 2013

Dyeing with Box Elder Bark

The weather has finally cooled a bit. I decided it was time to get back to dyeing wool. I started a pot of Boxelder bark before we left for our trip last weekend. The bark has been chopped up and soaking in a pot of water for about 8 days now, 8 very hot days. Oh the smell...  I simmered the pot for an hour and let it steep while I mordanted some wool in alum. I had to simmer it on the grill outside and close all the windows and doors on that side of the house. Probably a good thing I don't have neighbors nearby! If you decide to try this, beware, you can't do this one inside, good ventilation won't be good enough!
Box Elder trees (Acer Negundo) are native trees in this area and are a member of the maple family.  The sap has been used to make syrup and various parts of the tree have been used for many different things through the centuries. When the wood is injured, it reacts by turning a red wine color.  My husband used it for that reason to make boxes for red wine we made and gave as gifts. The colored streaks in the wood matched the color of the wine.

This is what the pot looked like after simmering. You can see the size of the bark pieces. When I strained the liquid it was slightly thicker than water. It was a very rich, dark brown. I added the mordanted wool and simmered it for an hour. Then I let the wool steep for several hours. After steeping for two hours what I had was a warm, brownish tan. I decided to just let it continue to steep to see if I would get more color. 


Meanwhile, I decided to pick the heads off some of the sow thistle growing around here. I picked a bunch of the flower heads and then removed just the petals, avoiding as much of the sepals and calyxes as possible. I put all the petals into a 2 quart jar and covered them with boiling water. I left that to sit in the sun for the rest of the afternoon and overnight.Tomorrow, a friend is coming and she is bringing onion skins. The real dyeing will happen tomorrow. I have done about all the prep work I can today.

While I was wandering around the yard I spied these and picked some for the deck!