September 27, 2013

It's What's for Dinner!

As you, my readers know, I have been on a mushroom quest lately! I decided it was time to bite the bullet and get in the kitchen. I have positively identified the Sulfur Shelf. I found this bunch on a tree out in the woods this afternoon. I talked it over with my husband, and he agreed to try some. I went out and gathered about a third of what is on that tree. I had done a lot of research and found that the new growth, about the outer most inch, was supposed to be the best eating. I cut most of one whole 'clump' and brought it inside. My husband's only comment was that he hoped it tasted better than it smelled, although, I didn't think it was so bad!

I cut the mushroom into slices. I kept about the outermost inch for cooking with and chopped the rest and put it in a dye pot. I had read that it was best to soak the mushroom pieces in vinegar and water (equal parts) before cooking to remove any dirt or bugs. I didn't find either, but I soaked the parts I was using for supper anyway just to be sure.

The chunks for the dye pot went directly onto the stove, covered with water. I simmered these for about an hour and then took them off the heat and left them in the liquid to steep overnight.

After I got done slicing and dicing the mushroom, I cut up some carrots, celery, onions, and garlic. I sauteed the vegetables in butter and olive oil until they started to soften and get tender. I took them out of the skillet and placed them in the stock pot with some chicken stock. Then, I added the mushrooms to the skillet and sauteed them for about 15 minutes. I added some sage, parsley, salt and pepper to the mushrooms.


I then added the mushrooms to the stock pot and simmered the soup for about 45 minutes, until all the vegetables were tender. I checked the seasoning and declared it done!


I called my husband to supper. I let him taste it first, (just in case). He thought it was very good, so I tried it. It really did taste like chicken soup! I think that I would not be so greedy next time and use more of the mushroom. The parts further in really had a texture like chicken. When I make it again, I plan to add some white beans-navy, great northern or cannelli beans for a bit of protein. I can see using this with a white sauce or Alfredo. I am going to harvest more for as long as the weather holds and the mushrooms are producing. Hopefully, I will be able to dehydrate a lot to use over the winter. Meanwhile...Soup's on!

Hunting for Wild Mushrooms


(First, before I start this post, I want to say that I am not an expert on mushrooms by any stretch of the imagination. Make sure if you hunt your own that you have very good guides (use several) or an expert to assist you. Remember...Mushrooms may be deadly poisonous if you get the wrong one by mistake.)


Taken this morning
We had a bit of rain early in the morning today. I thought it would be interesting to compare the Chicken of the Woods I found two days ago with how it looks today. I took my camera and headed outside. The mushroom had gotten much bigger. It is still very bright yellow and salmon colored.

Taken two days ago
I have never really looked for mushrooms. The only wild one I have ever eaten was a Morel. It was sauteed in butter and tasted delicious. I don't really care for the mushrooms I have bought at the store. My husband is a fan for sure. I have become interested because of the dyeing qualities of mushrooms. So, I headed into the woods this morning and began my hunt. I was pleasantly surprised with what I found. 


I found several more flushes of Sulfur Shelf, (Chicken of the woods, or Laetiporus sulphureus) in several places throughout the woods. I found it growing on other trees and in several different areas. Some of the new finds were much bigger than the one I found first. These are some of the new finds!


I also found some Shaggy Mane (Coprinus comatus). This is supposedly a delicious mushroom as well. When new and conical, makes a good substitute for asparagus. I am hoping that with the rains we are having this afternoon and evening I will be able to find some nice ones, enough to harvest. It is never good to take all of anything whether it is a flower or a mushroom, or anything else in nature. Leaving some will ensure that more will grow. Shaggy manes are often said to grow in clumps.


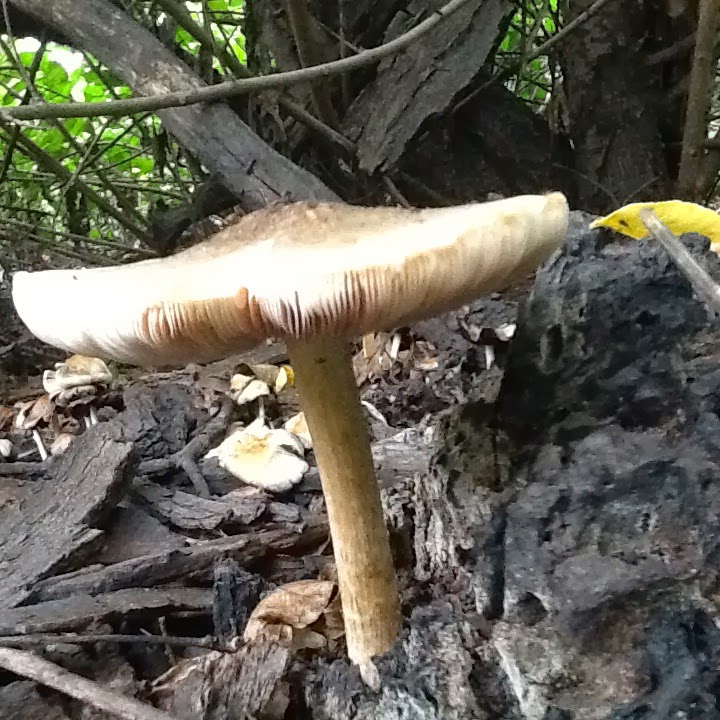
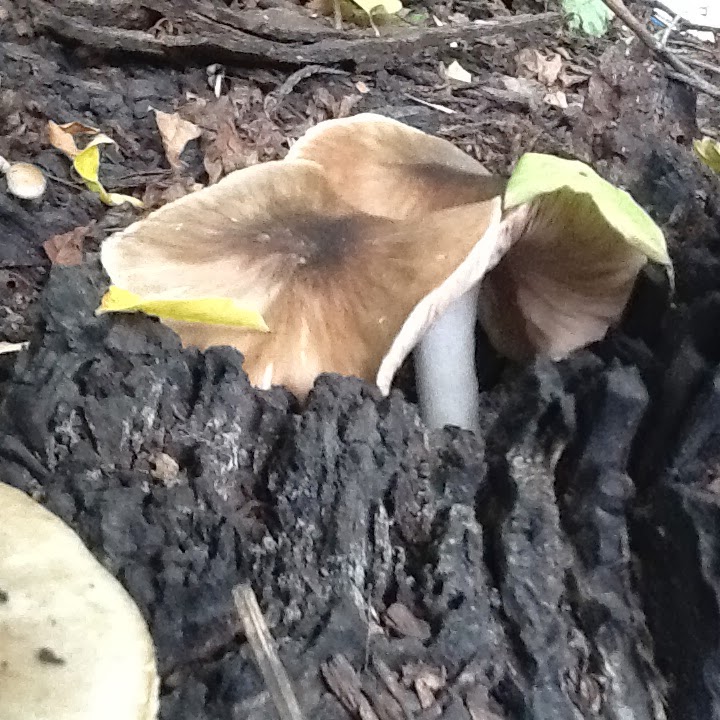
I found several other mushrooms today that I have not yet identified. I don't pick anything that I am not sure of. Mushrooms can be extremely poisonous. the best rule of thumb is, "when in doubt, throw it out". I would amend that to say, "when in doubt, don't touch it"! (If anyone has information on what some of these are, please let me know!)


Once I can identify a mushroom, I want to determine if it is edible. Even if they aren't my favorite, my husband loves them! Many mushrooms that are edible can still cause gastric upset in some people. Even if you determine that a mushroom is edible, for certain, eat a small amount at first to test for a reaction.


There is quite a variety! I plan to try to identify as many as I can and what I can't eat, I may be able to use for dyeing. I have seen some beautiful colors that have come from mushrooms! I hope to figure out how to do it myself.


 Could be Turkey tails?

I have a lot more research to do! I also plan to do a lot more hunting. Time is running out this year in this part of the country, but, there is no frost forecast this week!

Tomorrow, I am off to a Fiber Day at Northcroft Farm near Pelican Rapids, MN. Joan Jarvis Ellison and her husband, Dave, host two Fiber Days each year. Joan is a shepherdess. She raises, processes, and sells wool. She has sheep, alpaca, angora goats, and maybe something new! She is a knitter, spinner, weaver, and also a writer. She has a blog called Sheep Notes. She also has several books published. I am not sure how long she has hosted the Fiber Days, but they are well attended. Fiber artists, fiber newbies, and everything in between attend! People come from miles a way. There are always dye pots going and usually someone is demonstrating something. It is inspiring, educational, fun, and always a good time. I am planning to buy some roving. I have used up most of my white from this spring trying out plant dyes! I will let you know what I find!

September 25, 2013

Chicken of the Woods

These are photographs I took last summer in my yard. I didn't know at the time what I was looking at. I looked at several mushroom sites, but for some reason I didn't think this was the same as anything I found. This was growing out of an old Elm tree stump (on the West side). We cut the tree down years ago and carved a stool into the stump and the stump has been there ever since. Last summer is the first time anything like this developed. Recently, I discovered through a blog I follow,  , that what I had was a 'Sulfur Shelf' mushroom, also known as 'Chicken of the Woods' (Laetiporus sulphureus). Fellow blogger, Lisa Jordan (lil fish studios) is a seasoned mushroom hunter. She has several posts on eating, dyeing with and hunting mushrooms. Not only does this make a lovely dye bath, it also is edible and supposedly, tastes like...you got it, chicken!

Since I finally found out what I had, and more importantly, that it is useful for dyeing, I started looking for it again this summer. I have been disappointed in that there is no sign of it in the place it grew last year. I hadn't harvested any of it last year, not knowing what it was, so I hoped it would come back.


This morning when I walked out to the mailbox I passed the stump, as I do everyday. To my surprise, I found this on the 'seat' of the stump, (the East side). I am so happy to see this beautiful mushroom growing here again. I plan to watch it to see how much bigger it gets. I am going to harvest some of it this year, when it gets bigger, to dye with. I may even cook a little up for my husband (he is a much braver soul than me...).

I will report soon on the growth and dyeing of this gem. I can't wait to see if it grows as big as last year! Meanwhile, I am going to do a little more hunting to see if there is anything else wonderful in my woods.


September 24, 2013

North Country Fiber Fair

I have been hearing about the North Country Fiber Fair for several years. It is held each September in Watertown, South Dakota. I have thought about going many times, but it seemed that something always got in the way. This year, I finally made it. I had a wonderful time. There were many venders there from all over with items for sale and lots of new and interesting ideas. I met a lot of friendly people from a lot of different places. It is so inspiring to be surrounded by people who are as passionate about fiber as I am!

The fair lasts for three days. There is no admission fee. Countless demonstrations are taking place all three days. In the barn and area a there are sheep, goats, llamas, alpacas, even a Bactrin camel! There are animal judging contests, sheering demonstrations, dog obedience and sheep dog demonstrations.

Tracy Miller from Billabong Border Collies gave several demonstrations of border collies working stock. It was very entertaining and informative. Tracy explained that so much of what the dogs do is instinct, and the trainers' job is to work with the dog, teaching the dogs commands for what they are already doing.The dogs are definitely enjoying themselves, as is Tracy.
There are spinning wheels everywhere you look. Many venders selling spinning tools, yarn, looms, even baskets from Giana.


 I tried to stop myself, but I did buy some really wonderful roving, a large bag of beautifully hand dyed mohair locks, some yarns that were hand dyed, and almost another wheel...


Classes are offered on spinning, knitting, basket weaving, dying, color theory, crochet, photography, Kumihimo,braiding, felting, wool combing, tatting, nalbinding, rug hooking, and even building and using a triangle loom.


I didn't sign up for any classes this year, but will next year. It was really a lot of fun. Well worth the drive. Good people, interesting demonstrations, lovely things to touch and buy... and a lot of inspiration. I have all sorts of new things I want to try! Next year. I am already looking forward to it!


North Country Fiber Fair

September 16, 2013

It's a Matter of Madder

I am back at the dye pot again today. I have been experimenting with Madder. Madder is a plant root that has been used for dying for centuries. It produces many different shades, from pinks, reds, oranges, rusts and purples. I dyed some wool with madder several weeks ago using an alum mordant. The result was a beautiful orange, almost cinnabar.


Today, I used that same dye bath that I had saved from the first run. This time, it came out a deep, variegated rose color. This was very different than the original color. I was amazed at the difference between the first and second run.

I had mordanted some wool with copper. I decided to see what would happen if I used copper for a mordant instead of alum. I put some of the wool in the same pot as before. This time it turned a beautiful plum. I ran one more batch of wool through the pot that also had copper mordant. This time, I got a lilac color!

Below is a photo of all four batches of wool. Left to right: first run, alum mordant; second run alum mordant; third run copper; fourth run copper. Amazing. I am really pleased with all four results!


I thought that I would post a picture of my finished mordants. I started these back on July 23, 2013 (see that post for the instructions on making both mordants). The jars have been sitting out on the deck since then. Iron is on the right, copper on the left.


September 13, 2013

Addicted to Blending!

I have found that I really enjoy blending colors together. It is so fun to see what happens. I start with a picture in my mind, but it changes as the colors start to blend. I never know what I will end up with when it is all done and made into yarn. One thing that helps is that all the colors I am using are from nature so you can't really go too far off.

Just had to show you my latest blending project! This is a soft, beautiful three ply yarn that is thick/thin worsted weight.


From fuzzy worms!


Once again, blended on the drum carder. I used three large batts and ended up with 160 gr. of Navajo ply yarn. The skein is just over 200 yards. I don't know if I have the heart to make anything with it! The skein itself is so pretty, I hate to take it apart. 


September 8, 2013

Color Blending on a Drum Carder

Since I started dyeing wool and yarn I have a stash of really nice, naturally dyed fiber as well as some colored fleeces from colored sheep. I decided to try blending some of them on a drum carder. I have made 'art batts' by sandwiching different fibers together and then carding them. This is great for creating funky yarn, but I wanted something more uniform in texture. I put all the different colors of roving I have together with some colored fleece and picked out several I thought would meld nicely together.

I looked through my stash of miscellaneous fiber bits I have purchased at various places and times to add to my wool. I picked out some 50% Marino superfine-50% Tencel in Teal and white. I brought out some grey and some brown colored fleece and chose some roving dyed with red cabbage, onion skins and madder. These looked pretty nice together. I thought that adding the Marino/Tencel blend would add a little shimmer to the yarn without getting too flashy.  The base color was the red cabbage (on the bottom of the photo-it is blue-green, I know).

I started by applying a thin even layer of the red cabbage roving. To that I added bits of color. When I wanted a layer of color, as with the red cabbage, I applied it using the small roller to feed it to the large drum. If I was applying a color for punch or that I wanted only in certain places, I applied it directly onto the drum. When I got to a spot where I could no longer see a color, I added some more. If I thought it looked a little drab I found another color to add. When I thought the colors were getting too bright, I calmed them back down with some more red cabbage or some of the silver grey fleece.


As the batt was forming on the drum I kept a picture in my mind of the finished batt and how the yarn would look. I had a loose idea of what I wanted by thinking about New Mexico and the colors of the Southwest. It is pretty difficult to get really specific on a drum carder, but you can create beautiful color combinations and it gives you some control over how blended together the colors become. I new it was time to stop adding fiber when the drum was no longer picking up the wool from the small feeder roller. Below is a picture of the first batt completed on the drum.

I removed the batt with two large knitting needles, drafting and rolling it into rollags. I got five rollags. from this batt. 

I made another batt as much like the first as I could I tried to load the colors in a similar manner and also tried to get the batt about the same size as the first.  I got another five rollags from the second batt. I ended up making one more small batt, as that was all the red cabbage roving I had. Thirteen rollags total. I put them all in a basket and would spin them randomly to diminish the effect of coming from different batts.

I spun the rollags into a fine singles. Spinning from the rollag is really nice. You just tease the wool from one end. I knew I wanted the yarn plied, but wasn't sure how. I didn't want to ply two singles together because I didn't want to barber pole the colors on top of each other. Because the batts were made on a drum carder, I couldn't really control how the specific colors came off. I wanted them to stay as clear as possible.

 
 I decided that Navajo Ply was the way to go. I can't really describe how to ply this way here without making a video. It is a way of plying a three ply yarn from a single strand by making a loop in the single and bringing the the thread through the loop and spinning it all together. It is really best to watch a video or two. It can seem really tricky at first. Like anything else with spinning, you just have to practice until you 'feel' it. A big thing to watch out for is over-plying and getting a yarn with too much energy. It will appear over-twisted until it is washed, so don't expect it to ply back on itself nicely on the bobbin. It is important to keep a consistant amount of twist in the singles and matching it with the same amount of opposite twist in the yarn. A couple videos that I have seen that are really helpful are Susan Anderson - Navajo Plying and Navajo Plying.mp4 - Charlotte Bech. Both of these are well done and easy to understand.

This is my finished 'Taos' Navajo plied yarn. I ended up with about 180 yards of worsted/DK weight yarn. It is a very soft yarn with a nice amount of loft.


September 7, 2013

Saving the Harvest: Dehydrating Tomatoes

It seems like this time of year everything is getting ripe in the vegetable garden at once! I dread looking at the cucumbers, peppers and tomatoes because there are so many each day. I don't have my big freezer anymore, thanks to the flood this summer, and my little freezer in the refrigerator is completely packed. When I get enough tomatoes at one time I will can them. When they are coming faster than I can use, but not fast enough to can, I either freeze or dehydrate them.

I have a lot of cherry tomatoes...volunteers, not intended, but they are there just the same. I don't bother canning them and I don't want to freeze them, so I get out the dehydrator. With cherry tomatoes, I just wash them, cut them in half and place them on the drying trays.

I dry my cherry tomatoes for about 12 hours at 130 degrees. I have three trays ready to go. Everything is set and now I just relax and let it do it's thing.
When these are dry they will be fairly flat and leathery. To test to see when the are dry I tear one in half. I can see any moisture inside by looking at the torn edges. It is important that they are dry completely with no moisture pockets as this can cause rot if not kept frozen. At the same time, I don't want them completely brittle.

I like to chop these little gems and use them when making breads, for putting in salads and garnishing focaccia and other things.  They have a really sweet, rich flavor when they are dried. Think of fresh intensified! Another way to store them is to place them in a jar with some olive oil and garlic. This needs to be kept refridgerated due to the garlic. They take up remarkably little room. A few quart jars full of dehydrated vegetables will hold enough for several soups, stews, cassaroles and more and will last through the year.


I dry the large tomatoes as well. These are so easy to dehydrate. I boil them for about 30 seconds to one minute. Then I dump them into a pan of very cold water. I let them cool in the water. The skins will easily slip off the tomato. I simply cut the core out and slice them about 3/8" thick. I place these on the trays. I try to keep some of the best slices to snack on as slices. The small or imperfect pieces I use in soups and other cooking. At this point I may or may not season the slices with different herbs so they are really tasty later.

My tomatoes were not dry by the time I went to bed so I lowered the temperature in the dehydrator to 95 degrees over night. In the morning I tested for moisture and removed anything that was dry. I turned the temperature back up to 130 degrees.

I am using an old dehydrator I have had for close to twenty years. It is a great kitchen tool. I can dry all kinds of fruits, vegetables, herbs and other things in it. I have about seven trays so I can really load it up. Jerky is a breeze. Fruit leathers are easy as well. Once the food is loaded on the trays and the temperature set, it does all the work by itself. I start checking for pieces that are completely dehydrated after about 6-7 hours. The drying time varies due to the type and thickness of the food, how full the dehydrator is, how much liquid is in the food and so on. I remove pieces as they are completely dry and leave the rest to finish.
This is my plate of tomato slices! Doesn't look like much, but remember, this is three trays of tomato slices. The flavor and nutrients are highly concentrated. A little bit goes a long way when they are rehydrated or used in cooking. They will store in very little space. Four or five slices equals one whole tomato.


the cherry tomatoes are done now as well. Roughly 2 quarts of tomatoes reduced to less than two cups! Here is what I have.Even I have room in the freezer for these. They can also be stored in air-tight containers on a shelf.